
QuackChat on Shopify
Add the QuackChat chat widget to your Shopify storefront. It runs on every storefront page (home, collections, products, cart, blog and pages), and takes about five minutes.
Quick Start (TL;DR)
- Install the QuackChat app on your store, from the Shopify App Store or from Settings > Integrations > Online Store inside QuackChat
- Pick which AI assistant this store should use
- Go to Online Store > Edit theme, open the App embeds panel (last icon at the top of the sidebar, or Ctrl+3), and switch QuackChat on
- Click Save, then open your storefront in a private window. There is nothing to paste
Prerequisites
- Shopify admin access with permission to manage themes
- A QuackChat account (you create one during install, if you do not have one)
Step-by-Step Installation
Turn on the app embed
The QuackChat app ships a theme app embed. It needs no code, it survives theme updates and theme switches, and uninstalling the app removes the widget cleanly.
-
Install the QuackChat app on your store. From the Shopify App Store if you have found us there, or from Settings > Integrations > Online Store inside QuackChat, which installs the same app. Then pick which AI assistant this store should use. Installing from the App Store never asks you to type your store address
Shortcut. The last screen has a Turn the chat on in my theme button that jumps straight to the App embeds panel with QuackChat already switched on, so you can skip steps 2 to 4 and go straight to Save.
-
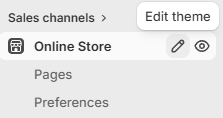
From your Shopify admin, open Online Store under Sales channels and click Edit theme (the pencil icon on the Online Store row does the same thing)
-
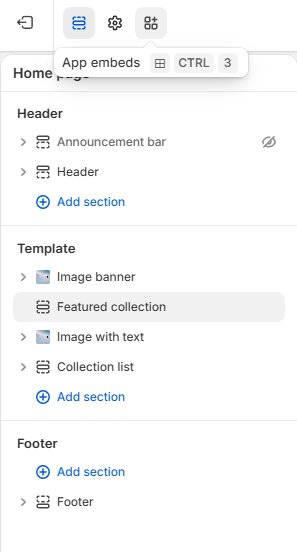
In the theme editor, click the App embeds icon. It is the last of the four icons at the top of the left sidebar, the one shaped like a grid of squares. Keyboard shortcut: Ctrl+3 (Cmd+3 on Mac)
-
Find QuackChat in the list and click its toggle to turn it on
-
Leave Bot ID blank. The app already knows which assistant belongs to this store
-
Optionally change Position (bottom right by default)
-
Click Save
App embeds are not sections. The theme editor opens on the section list, where Add section only offers your theme's own sections. QuackChat will never appear there. It lives in the separate App embeds panel reached by the icon above.
App embeds work on any theme version, so you do not need an Online Store 2.0 theme for this.
Auto-detect needs a live store connection, which is a Pro or Managed feature. On Free the app embed cannot tell which assistant belongs to this store, so paste a Bot ID into the Bot ID field (your bot's Deploy page has a Copy Bot ID button), or use the advanced section at the end of this guide.
The Bot ID field is an override, not a step. Leave it blank and the widget uses the assistant connected to this store. Fill it in only to run a different assistant on this storefront.
Everything else is configured in QuackChat
Greeting, colours, avatar, bot name and auto-open behaviour live in your bot's Settings (Appearance and Engagement), and the widget fetches them at load. So they stay in sync across every site the bot runs on, and there is nothing else to put in the snippet. Don't try to set them as data- attributes. The server values win.
Verification
- Open your storefront in a private window (Shopify and Cloudflare both cache storefront HTML)
- Look for the chat bubble in the bottom-right corner
- Click to open and send a test message
To check from the browser console:
// Loaded?
console.log(typeof window.QuackChatWidget); // "object"

// Open it
window.QuackChatWidget.open();
Advanced: adding the widget without the app
You do not need this. The app embed above is the supported install and the one to use on every Shopify storefront. This section is for a merchant who deliberately does not want the app installed. It needs a Bot ID, Shopify overwrites it whenever your theme updates, and it does not get the live-catalogue features the app brings.
Install by editing theme.liquid
theme.liquid wraps every storefront page, so one paste covers the whole store.
- From your Shopify admin, go to Online Store > Themes
- On your live theme, click the ... button and choose Edit code
- In the left sidebar open the Layout folder and click
theme.liquid - Scroll to the bottom and find the closing
</body>tag - Paste this on the line just above
</body>, replacingYOUR_BOT_IDwith your own:
<script
  src="https://www.quackchat.app/widget/quackchat-widget.js"
  data-bot-id="YOUR_BOT_ID"
  data-position="bottom-right"
></script>
- Click Save
Back up your theme first, and expect to redo this. Shopify replaces your theme's code when the theme updates, and hand-edits go with it. Duplicate the theme (... > Duplicate) before you start so you can roll back, and re-apply the snippet after every theme update. The app embed exists precisely to avoid this.
Show the widget only on certain pages
template.name holds the current page type: index, product, collection, cart, page, blog, article, search, 404:
{% if template.name == 'product' or template.name == 'collection' %}
  <script
    src="https://www.quackchat.app/widget/quackchat-widget.js"
    data-bot-id="YOUR_BOT_ID"
    data-position="bottom-right"
  ></script>
{% endif %}
Hide it on the cart page
{% unless template.name == 'cart' %}
  <script
    src="https://www.quackchat.app/widget/quackchat-widget.js"
    data-bot-id="YOUR_BOT_ID"
    data-position="bottom-right"
  ></script>
{% endunless %}
Troubleshooting
The bubble never appears
Cause: You edited or customized a theme that isn't the live one. The Themes page marks the live theme; everything else is a draft.
Solution: Confirm you're on the live theme, or preview the draft you edited.
I can't find QuackChat in the theme editor
Cause: You're looking under Add section. That list only contains your theme's own sections, so no app will ever show up in it.
Solution: Switch to the App embeds panel: the last of the four icons at the top of the theme editor's left sidebar, or press Ctrl+3 (Cmd+3 on Mac). QuackChat is in that list.
Nothing happens after turning on the app embed
Cause: Either this store is not connected to a QuackChat account yet, or the Bot ID field holds a half-pasted value. A partly-pasted snippet renders nothing on purpose, so a half-configured store never ships a broken script tag.
Solution: Clear the Bot ID field completely and Save. If the bubble still does not appear, finish connecting the store in QuackChat.
It worked, then disappeared
Cause: Your theme updated, and Shopify replaced the theme code, taking a hand-pasted snippet with it.
Solution: Switch to the app embed, which survives theme updates.
Widget appears twice
Cause: The snippet was added more than once, or you have both the app embed and the theme.liquid paste.
Solution: Pick one. Search your theme code for "quackchat" and remove the extras.
Your customers can't see it, but you can
Cause: Cached storefront HTML, or the store is still password-protected.
Solution: Hard-refresh, or check Online Store > Preferences for the password page.
Another chat app is in the way
Cause: Tidio, Gorgias, Zendesk and similar apps put their own launcher in the same corner.
Solution: Remove the other app, or change Position so the two don't overlap.
Live store answers
Connect your store and the bot answers from live Shopify data (product availability, prices, variants, stock and categories) instead of only what it crawled from your site. Order lookup is not available on Shopify yet: Shopify gates order and customer reads behind its protected customer data programme.
Set it up in QuackChat under Settings > Integrations, then authorise your store. The connection is read-only: QuackChat never writes to your store.
The bot also reads your metaobjects, which is where most stores keep their size and fit charts, care instructions, ingredient lists and spec tables. That means an attribute question is answered from the table you built rather than inferred from a product description. If your store defines no metaobjects, the bot simply answers from the product details instead.
Shoppers can add an item to their cart from a product card in the chat, in one tap. That runs against your store's own cart in the shopper's browser, exactly like the button on your product page, so it is a shopper action rather than a write from us.
Performance
- The widget is served from QuackChat's CDN, under 83 KB gzipped
- The snippet sits just before
</body>, so it doesn't block page rendering; the app embed loads it asynchronously - It's a single request, and nothing on your storefront waits for it
Known Limitations
- The widget doesn't run on checkout or order-status pages. Shopify doesn't render theme code, app blocks or app embeds there. Note that checkout
Additional scriptsare being sunset for non-Plus stores on 26 August 2026, so that isn't a workaround either. - Hand-edited
theme.liquidis overwritten by theme updates. Use the app embed to avoid it. - Headless storefronts (Hydrogen, Oxygen, custom front ends) have no
theme.liquid. Add the same<script>tag to your app's root layout instead. - Order-status lookup isn't available on Shopify. Reading the email on an order sits behind Shopify's protected customer data programme. On WooCommerce the bot can verify a shopper with their order number plus billing email; on Shopify it can't yet.
- Merchant-set product pairings aren't available. "Linked Products" is a WooCommerce feature with no Shopify equivalent, so related-item suggestions come from the bot reading your catalogue rather than pairings you configure.